Par Nancy Berger, conseillère pédagonumérique, Service national du RÉCIT en formation professionnelle.
En formation professionnelle, quelques programmes comprennent l’enseignement et l’apprentissage de notions d’électricité, d’électronique et de programmation, des concepts qui peuvent paraître abstraits aux yeux des apprenants. Pour les rendre plus concrets, pourquoi ne pas utiliser des cartes électroniques simples et ludiques! Allons voir plus loin.
En formation professionnelle, quelques programmes comprennent l’enseignement et l’apprentissage de notions d’électricité, d’électronique et de programmation. On n’a qu’à penser aux programmes d’électricité, d’électromécanique de systèmes automatisés, de montage de câbles et de circuits, de réparation d’appareils électroniques audiovidéos ou de réparation et service en électronique. Les notions à maîtriser peuvent paraître abstraites pour les étudiants.
Voici donc des composantes qui permettent d’initier graduellement les apprenants à ces sujets. On commence avec la carte Makey Makey, qui est un circuit électronique simple permettant une découverte intuitive des circuits. Ensuite, on passe à Micro:bit, qui est un microprocesseur que l’on doit programmer. Sa programmation est simple et se fait par blocs. Enfin, on termine avec la carte Arduino, qui contient deux microcontrôleurs et qui doit être programmée sur son interface en langage C++. Chaque carte apporte un degré de complexité supplémentaire pour arriver à maîtriser les bases de l’électricité, de l’électronique et de la programmation. Voyons plus en détail.
La carte Makey Makey
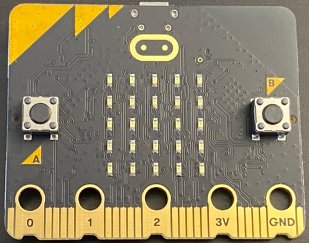
La carte Makey Makey permet d’apprendre les bases de l’électricité en testant la conductibilité des matériaux utilisés dans les circuits. Elle peut être utilisée en combinaison avec la carte Micro:bit pour ajouter une composante de programmation.
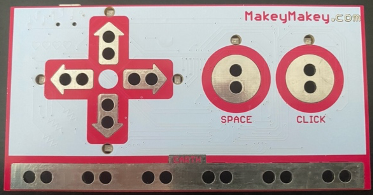
Figure 1 : Recto d’une carte Makey Makey
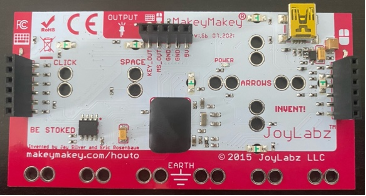
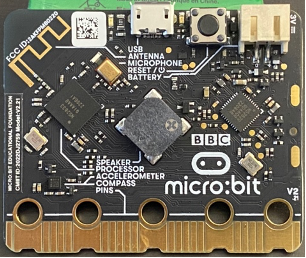
Figure 2 : Verso d’une carte Makey Makey
À partir des projets faits avec Makey Makey, il est possible de vérifier le fonctionnement de circuits électriques ou électroniques et de dessiner les schémas électriques correspondants, deux compétences des programmes d’électricité et d’électromécanique de systèmes automatisés.
Les cartes Makey Makey permettent une initiation à la vérification et la réparation de circuits électriques simples, deux compétences des programmes de montage de câbles et de circuits et de réparation et service en électronique. Comme il peut être utilisé en combinaison avec Micro:bit, un microprocesseur, il permet aussi l’initiation à ce type de composante pour accommoder les étudiants du programme de réparation d’appareils électroniques audiovidéos.
Pour mieux comprendre, voici une première vidéo dans laquelle on voit un piano dont les touches sont activées par le contact direct avec des fruits. Dans cet exemple, on peut questionner les élèves sur les principes d’inductance et de conductibilité. L’apprenant devra alors se demander pourquoi le contact avec un fruit permet l’activation d’une branche du circuit, de quel type de circuit il s’agit, comment le courant circule à l’intérieur des fruits, etc. On peut aussi amener les élèves à réfléchir sur la constitution même du circuit. L’apprenant devra alors tenter de comprendre pourquoi un lien avec un matériau conducteur (anneau de cuivre) est important pour l’activation d’une branche du circuit ou comment les touches peuvent être activées de façon indépendante. On introduit alors la notion de mise à terre et de circuit en parallèle.
La carte Micro:bit
Le microprocesseur Micro:bit permet d’apprendre les bases de l’électronique et de la programmation en utilisant la carte en combinaison avec l’application Microsoft Make Code. Il est conseillé d’utiliser cet outil après avoir maîtrisé la carte Makey Makey pour une appropriation plus rapide.
Dans le programme d’électromécanique de systèmes automatisés, les élèves doivent apprendre à programmer. L’utilisation de la carte Micro:bit permet une initiation à cette compétence. Dans les programmes de réparation et service en électronique et de réparation d’appareils électroniques audiovidéos, les élèves doivent apprendre à travailler avec des microprocesseurs. La carte Micro:bit en est un. Elle permet donc une bonne initiation à ce type de composante.
Dans cette deuxième vidéo, on voit une utilisation ludique de la carte Micro:bit, soit la reproduction d’un dé à jouer virtuel. Ceci permet d’introduire les notions de commandes aléatoires, d’instructions conditionnelles et de variables, qui sont les bases de la programmation. Le langage utilisé est le JavaScript, un langage simple et efficace. C’est une belle façon d’initier les apprenants à la programmation, car tout peut se faire en français et les différents éléments de programmation sont des blocs de différentes couleurs, selon leur type.
Dans cette troisième vidéo, on voit une utilisation plus pratique de la carte Micro:bit, soit l’élaboration d’un capteur d’humidité du sol appelé hygromètre. Avec cet exercice, les apprenants peuvent pratiquer la programmation de base, mais aussi le montage d’un circuit simple, compétence que doivent maîtriser les élèves en électricité et en électromécanique de systèmes automatisés. Ils doivent bien comprendre le concept de transport des électrons pour être en mesure de paramétrer leur capteur.
La combinaison Makey Makey et Micro:bit
Une fois que les cartes Makey Makey et Micro:bit sont bien maîtrisées, il est possible de les combiner. Il faut alors programmer dans Scratch, dans le langage C. Ce langage est maintenant utilisé pour programmer certains automates modernes qui sont à l’étude dans le programme d’électromécanique de systèmes automatisés.
Dans cette quatrième vidéo, on voit cette interaction entre les deux cartes. Pour cette démonstration, les deux cartes doivent être reliées à l’ordinateur sur lequel on a programmé. Le ruban conducteur est utilisé pour électrifier les doigts d’un gant. Lorsqu’on plie les doigts, on touche un bout de ruban conducteur placé sur la paume de la main, ce qui ferme une branche du circuit et permet le passage du courant. Selon le doigt plié et la position de la carte Micro:bit, on entend un son différent, on voit un affichage varié sur la carte Micro:bit et on change l’arrière-plan derrière le personnage dans l’interface de Scratch. Ce projet permet d’approfondir les connaissances des apprenants sur la formation des circuits électriques et sur la programmation en C. On rejoint donc des compétences des programmes d’électricité, de réparation et service en électronique et d’électromécanique des systèmes automatisés.
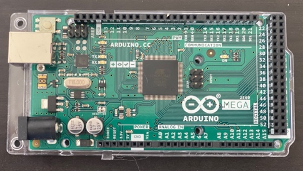
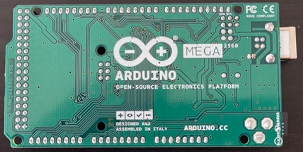
La carte Arduino
La carte Arduino permet d’approfondir les bases de l’électronique et de la programmation, cette fois en langage C++. Elle permet de faire une introduction intéressante aux composantes électroniques et, éventuellement, aux automates programmables en C. En effet, la carte Arduino comprend deux microcontrôleurs et un microprocesseur, des composantes que l’on retrouve aussi dans les automates. La manipulation de cette carte rejoint donc les intérêts des programmes d’électromécanique de systèmes automatisés, d’électricité et de réparation et service en électronique.
Les projets que l’on peut faire avec la carte Arduino sont quasiment illimités. On peut y associer différentes composantes comme les DEL, les moteurs, les capteurs, etc. Dans cette cinquième vidéo, on présente le projet du dé à jouer virtuel. Il s’agit du même exercice que celui présenté dans la deuxième capsule vidéo, mais en utilisant ce nouvel outil. On doit d’abord programmer la carte à l’aide de l’interface Arduino IDE, disponible gratuitement en ligne. Ensuite, il faut câbler toutes les composantes sur la carte Arduino Mega en respectant le code préalablement établi et les spécificités de chacune. Par exemple, une DEL doit être protégée par une résistance. Le dé à jouer sera contrôlé par un interrupteur à bouton poussoir; il affichera un nouveau motif chaque fois que l’on appuiera sur le bouton.
Dans la sixième vidéo, on modélise le fonctionnement d’une barrière de stationnement automobile. Pour ce faire, on utilise un interrupteur à bouton poussoir et un servomoteur. Il est à noter que l’on pourrait remplacer l’interrupteur par un capteur de pression. Dans le cas présent, lorsqu’on appuiera sur le bouton, l’hélice du moteur tournera de 90° vers le haut. Quand le bouton sera relâché, l’hélice redescendra à sa position initiale. Le tout doit encore une fois être programmé dans l’interface Arduino IDE et câblé sur la carte en respectant le code et les spécificités des composantes. Par exemple, on doit utiliser un condensateur avec les servomoteurs.
Le mot de la fin
Afin de bien préparer les élèves à travailler en électricité, en électronique et en programmation, le personnel enseignant doit user de stratégies innovantes pour faire comprendre les principes de base de ces disciplines, malgré leur caractère abstrait. Les cartes Makey Makey, Micro:bit et Arduino peuvent servir d’amorces pour comprendre les circuits électriques et électroniques et s’initier graduellement à la programmation. Ces cartes revêtent un aspect ludique qui motive les élèves dans leur cheminement.
Chaque carte progresse vers un niveau de défi supérieur, permettant de bien comprendre le fonctionnement des circuits. Ainsi, les apprenants seront mieux outillés pour faire des installations variées et diagnostiquer des problèmes éventuels dans des systèmes déjà en place.
Si l’utilisation de ces cartes vous interpelle, n’hésitez pas à communiquer avec votre conseiller ou conseillère pédagogique du RÉCIT FP, qui pourra vous épauler dans la mise en place d’activités en lien avec votre programme.